Showing posts with label Cookies. Show all posts

Thursday, July 3, 2014

Norma's Sugar Cookies

I wish my name were Norma.

Because then I could take credit for these cookie. This is one of those recipes that only exists on a old smudged recipe card in the little blue gingham book of my moms, and she has no idea who Norma is. (Ironically enough, I also have a blue gingham book to hold my recipe cards. I've never thought of that before.)


My grandmas' names are not Norma and to my knowledge I don't have any cousins, aunts, great aunts, or second cousins named Norma. Who was she then?

She was a cookie master.


I really do not like crunchy sugar cookies, and these sugar cookies are to blame for that. All growing up, mom would make these soft sugar cookies and frost them with a light green cream cheese frosting (I'm not sure why, but is was always green). When I think about a sugar cookie, it is always first a green Norma sugar cookie.

Oh, thank you, Norma, whoever you are, for your wonderful sugar cookies and somehow getting the recipe for them to my mom years ago.

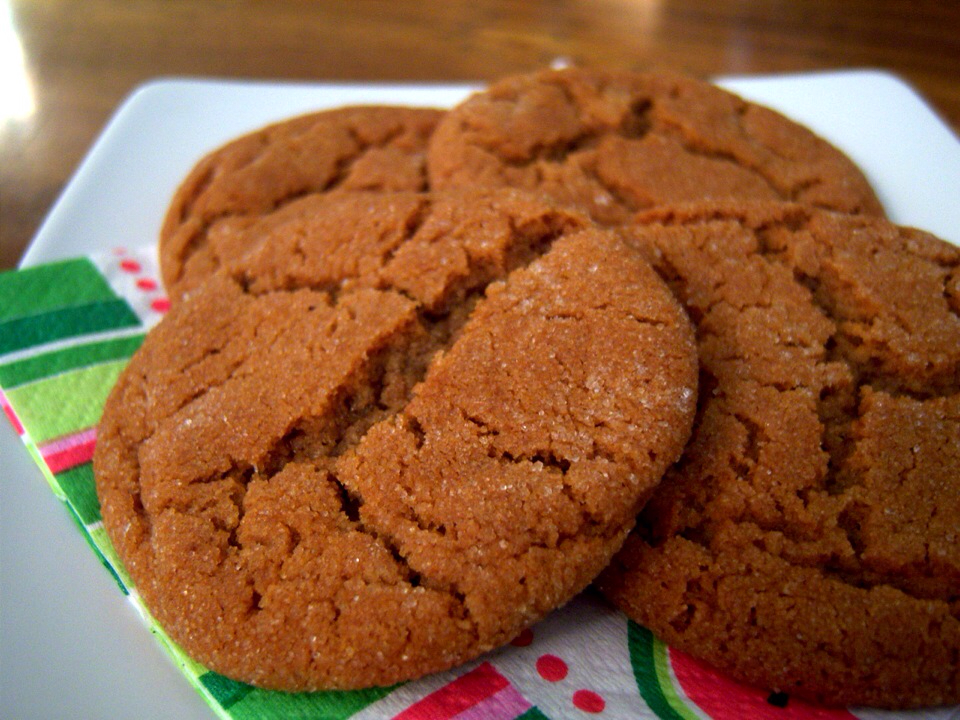
Because these cookies are soft, you cannot roll the dough out and cut it with fun cookie cutters. They are just meant to be round. This recipe also make a lot of cookies which makes it the perfect go-to cookie for parties and outings. Take extra care not to over bake them! They are best when they actually don't have any color, because they for sure stay soft then.

Norma's Sugar Cookies
Makes about 6-8 dozen

2 sticks butter, softened
2 cups sugar
2 eggs
1 cup oil
1 teaspoon vanilla
5 cups flour
2 teaspoons cream of Tartar
2 teaspoons baking soda
1/4 teaspoon salt

1. In a large mixing bowl, combine the butter and the sugar. Beat until very light in color and fluffy, about 10 minutes if using a hand mixer or on high in a stand mixer for about 5 minutes.

2. Reduce the speed to low and add the eggs one at time, making sure it is completely mixed after each addition. Then add in the oil and the vanilla and beat for one more minute until fully incorporated.

3. In a separate mixing bowl, combine the flour, cream of Tartar, baking soda, and salt. Whisk to combine.

4. Add the dry ingredients to the wet ingredients all at once and stir to combine. Refrigerate the dough until it is firm, for at least a few hours or overnight.

5. When you are ready to bake the cookies, preheat the oven to 350°. Place round scoops of cookie dough onto an ungreased cookie sheet. Flatten the dough with the bottom of a drinking glass until it is about 1/2 inch thick.

6. Bake the cookies for 8-9 minutes, taking extra care not to over bake them! When they are finished, they really shouldn't have any color. Let the cookies sit on the cookie sheet for 3-5 minutes then gently move them to a cooling rack. Frost with cream cheese frosting or leave them unfrosted, Enjoy!

Monday, February 18, 2013

Pirouette Cookies

It's crazy how life sometimes piles up, then you blink and wonder, "Where did all the time go?" I keep looking back over the past few months, and then the past year and several years and I am a little in awe of all that God has brought me through. Looking back gives me hope for the future because I can see how He has been faithful before and I know He will be moving forward. That is something I am very grateful for.

My Grandpa Dale died the week before Christmas. We were very close and had been my entire life. Even though the following weeks were hard, I have found that the times I have missed him the most are completely unexpected and sudden, and all within the last month or so. Like when I'm standing at the grocery store and suddenly smell an assortment of things that remind me of my grandparents' house. Or when I find myself singing some old song, then sadly realizing that if I can't remember the words, I have no one to ask. I miss him in the little things.

At Christmas time, I was going to do a whole series of Christmas cookies, but with everything happening the way it did, I didn't get around to it. Then life started in full swing in January and I am still a few months behind. I noticed the other day that I still have a couple pumpkins and a few very Christmas-y things sitting around my apartment. Time keeps ticking, but it stands still at our place.

On the Saturday before Christmas, I made a couple hundred cookies for families at church. I love how long days of baking make you exhausted but so satisfied at the same time. I also spent some time baking before we went home, which is when these lovely little cookies made their debut.


As I have probably mentioned before, I need something crunchy to dip in my coffee. Or my tea. Or hot chocolate. Or whatever hot beverage I happen to be enjoying at the time. It's like Oreos and milk. Or bacon and eggs. You CAN do one without the other, but why would you?


These cookies are especially crunchy and have the perfect balance of vanilla and chocolate. They soak things up nicely and tend to not fall apart so easily. I rolled mine on the handle of a wooded spoon, but I think I am going to get a small wooded dowel for the next time I make them since the wooden spoon made them just a little larger than I wanted. I am also planning on experimenting with a filling of some sort, too, and probably something chocolate or hazelnut to mimic the Pepperidge Farm pirouettes.

Pirouettes
Makes about 16

1/2 cup (1 stick) butter, at room temperature
1/2 cup sugar
2 egg whites
1/2 teaspoon vanilla
1/2 cup flour

Dark chocolate, for drizzling

1. Preheat the oven to 400°. Place a non-stick baking mat on a cookie sheet, and place it in the oven to preheat also.

2. In a bowl, cream together the butter, sugar, and egg whites until very light and fluffy. Add the vanilla and beat again to combine. With the mixer on low, slowly add the flour and beat just until it is combined.

3. Place a scoop of the dough in a glass measuring cup and heat in the microwave for about 8 seconds to warm the dough and make it pour easily.

4. Remove the preheated cookie sheet from the oven. Use a spoon to pour about a tablespoon of dough on the cookie sheet in 4 or 5 spots on the sheet. Make sure that they are well spaced. Then tilt the cookie sheet to get the dough to spread around in a thin, flat circle. Make sure the dough circles do not touch.

5. Bake the cookies for 4 to 6 minutes, or until they are just starting to brown and turn golden around all edges. Remove the pan from the oven, and immediately roll a cookie around a small wooden dowel or the handle of a wooden spoon. Be careful not to burn yourself!  The cookie will be very hot.  Place the rolled cookie on a cooling rack. Repeat with the remaining cookies. Work quickly to role all of the cookies before they cool.

6. Heat another scoop of dough in the microwave again and repeat the process. When the cookies are cool, dip or drizzle with chocolate. Enjoy!

*If you are having a little trouble envisioning all the steps, the recipe I used has good step by step pictures you might want to check out.

Recipe adapted from The Chocolate Gourmand.

Tuesday, November 6, 2012

Chocolate Sandwich Cookies

"You should eat me-- I'm basically an Oreo."

That was the note I left on these cookies. I was headed out the door on my way to work, and I knew without a note, he would totally miss the bright green plastic container on the table. When we made these cookies together for the first time, they were amazing. It had been a long week for my husband, so I decided to surprise him by making them again.

However, I was almost devastated when I accidentally baked them just a little longer than I meant to. No one likes a crunchy cookie, or at least I don't. I went ahead and put them together anyway, fighting the urge just to throw them away and start over. To my surprise, they were actually better than when I made them before. The slightly crunchy sandwich cookie was very much like a homemade Oreo. We go through lots of Oreo cookies around here, especially this time of year when you can buy the orange ones. Cookie disaster averted.

This is a great recipe to make with little kids around, because the process is quick and there are lots of steps for anyone to help with. Although they are great by themselves, they are even better when dunked in a cup of hot chocolate or coffee. And since you'll have the marshmallow creme out anyway, you might as well put a big spoonful on top of that hot chocolate, too.


Chocolate Sandwich Cookies
Makes about 12 sandwiches

For the Cookies:
1/2 cup shortening
1 cup sugar
1 egg
1 teaspoon vanilla
1 1/2 cups all-purpose flour
1/3 cup unsweetened cocoa
1/2 teaspoon baking soda
1/2 teaspoon salt
1/4 cup milk

For the cream filling:
4 tablespoons butter, softened
2 tablespoons shortening
3/4 cup marshmallow creme
3/4 teaspoon vanilla
1 cup powdered sugar
food coloring, if desired
Sprinkles or colored sugar, if desired

1. Preheat the oven to 375°. In a large bowl, cream together the shortening, sugar, egg, and vanilla until light and fluffy, about 2 to 3 minutes. In another bowl, sift together the flour, cocoa, baking soda, and salt. Add the dry ingredients alternately with the milk to the creamed mixture until everything is combined.

2. Drop teaspoons of cookie dough onto an ungreased cookie sheet (a small cookie scoop works best). You want the cookies to be all the same size. Bake for 11 to 12 minutes, or until the cookies are soft-set. If you want a slightly crunchier cookie, let them bake for 1 to 2 minutes more.

3. Allow the cookies to cool briefly, then transfer them to a wire rack to cool completely. Repeat with the remaining cookie dough.

4. To make the creme filling, in a bowl cream the butter and the shortening together. Gradually add the marshmallow creme, then add the vanilla and the powdered sugar. Beat to a spreading consistency. Add the food coloring, if using, and stir to combine until your desired color is reached.

5. To assemble the cookies, first go through them and match up pairs of cookies that are the same size. Spread about 1 tablespoon of creme filling on one cookie, and place the other cookie on top. Roll the cookie sandwich in the sprinkles or colored sugar to coat the edges where the creme filling is showing. Enjoy!

Recipe adapted from Hershey's Chocolate Treasury

Wednesday, August 22, 2012

Cookies and Cream Ice Cream

One time at a little ice cream shop somewhere in Massachusetts, I ate the most wonderful Cookies and Cream ice cream. One scoop high in a sugar cone. I purchased it on a whim, and the ice cream was so perfect that I went back the next morning before we left the quaint little town and ordered another one. Four years later, here I am still thinking about it. If you know me at all, then you will realize how truly weird this occurrence was, since I don't really like ice cream that much, and anything too sweet in the morning is just not a good thing for me. Oh, what I would do to have one of those ice cream cones again!

I also like to make ice cream on a whim, which is why this has become my go-to recipe. This ice cream is really easy to make, requires little forethought and tastes great. Pretty typically, if we happen to have Oreos around and I'm making ice cream, then the cookies end up mixed in, which is why I included them in this recipe. Feel free to leave the cookies out if you want to have just vanilla ice cream. Or get creative and add some of your favorite things! All you have to do is make the ice cream, and add in whatever you want during the last minute or two of churning.


Cookies and Cream Ice Cream
Makes about 1 quart

1 1/2 cups heavy whipping cream
1 1/2 cups milk
3/4 cups sugar
pinch salt
1 vanilla bean (optional)
1 to 2 teaspoons vanilla extract
about 8 to 10 Oreo cookies

1. In a medium saucepan, combine 1 cup of the cream with the sugar and the salt. Scrape the seeds from the vanilla bean then add them and the whole bean to the saucepan.  Heat the mixture just until the sugar has dissolved.  While it is heating, stir it occasionally, but be careful not to over-stir the mixture.

2. Remove from heat, and transfer the cream mixer to a bowl and add the rest of the cream, the milk, and the vanilla extract. Chill the mixture thoroughly in the fridge for several hours, or you can speed the process up by putting it in the freezer for 30 minutes. Make sure it does not begin to freeze though!

3. When you are ready to make the ice cream, remove the vanilla bean and proceed as you normally do with your ice cream maker.

4. While the ice cream is churning, coarsely chop the Oreo cookies into pieces. Add the cookie pieces to the ice cream during the last couple minutes of churning. Eat the ice cream right away or allow it to firm up in the freezer before serving. Enjoy!

Source: Recipe adapted from Annie's Eats, originally from The Perfect Scoop by David Lebovitz

Tuesday, June 5, 2012

Gingersnaps

Or as I like to call them, "Gingersnaps Yo," thanks to my friend Hanna's little sister. Back when Hanna and I lived together, the recipe for these amazing cookies showed up one day on our fridge. Hanna had wanted to make gingersnaps, so I think that her sister wrote down the recipe from their mom and gave the well-known cookie's name a new twist. I have made gingersnaps my whole life and this is now my go-to recipe. When we moved, I somehow ended up with the recipe for a while in my stash of random recipes that are all jotted down on random pieces of paper. I have this little magnetic notepad thing with a pocket that usually sits on the front of my fridge. The pocket is great for holding recipes, notes, and coupons. One day when I was going through the clippings, I found the "gingersnaps yo" page. I have since then given the recipe back to Hanna, but not before making sure it was added to my collection.

One thing I really like about these cookies is that they are really easy to make and the recipe does not make a huge batch of cookies, so it's perfect if I'm making cookies for just the two of us at home. If you are wanting to take the cookies to an event or something, or you happen to live with several cookie monsters, you might want to double the recipe. Also, I usually tend to bake them so that they are more chewy instead of snappy, like the name implies. That, of course, is up to you.

 As the cookies were baking last night, my husband told me it smelled like Christmas in our apartment. How can you go wrong with something that smells like that? :)


Gingersnaps Yo
Makes about 30 cookies

1 cup sugar
3/4 cup butter, softened
1/4 cup molasses
1 egg
2 1/4 cups flour
2 teaspoons baking soda
1/2 teaspoon salt
1 teaspoon ground cinnamon
1/2 teaspoon ground ginger
1/2 teaspoon ground cloves
1/4 teaspoon nutmeg
1/2 cup sugar, for rolling

1. Preheat the oven to 350°.

2. Begin by creaming together the butter and the sugar in a large bowl until combined. Add in the molasses and the the egg. Mix well, then set the bowl aside.

3. In a medium bowl, whisk together the flour, baking soda, salt, and all the spices until no streaks remain. Add the dry ingredients into the large bowl with the wet ingredients and stir with a wooden spoon until well combined.

4. If the dough is very soft, refrigerate it for about 30 minutes to allow the dough to firm up. When ready to bake, roll teaspoon sized balls of dough in sugar and place on an ungreased cookie sheet about 2 inches apart from each other.

5. Bake for 8 to 12 minutes. For a truly snappy cookie, you can bake the cookies for a minutes longer, but be careful not to burn them! Allow the cookies to cool for a few minutes on the cookie sheet, then move to a wire cooling rack to cool completely. Enjoy!

Friday, May 18, 2012

Double Chocolate Biscotti

Someone once told me that Swedish people typically like to dunk something crunchy or hard, like a cookie, in their coffee. Now, I'm not really sure if that is true or not, but one thing I know for certain is that I have quite a bit of Swedish blood in me and I absolutely love dunking things in coffee or tea or just about any liquid that I am drinking. I don't even mind all the soggy crumbs that accumulate in the bottom of the mug. Coincidence? Perhaps, but I like the idea that I do things the way I do because my family members a hundred years ago did the same thing. It's kind of a neat connection. Maybe someday I'll have the chance to visit Sweden and find out first hand.

Anyway, if you also like dunking things, then I hope you have had the chance to make your own biscotti, and if not, then maybe today is your day! I think that biscotti is one of the easiest things to make, and I usually have all the things I need on hand, which is nice because I don't have to make any extra trips to the store. This double chocolate biscotti is a favorite of mine with coffee since it has such a dark chocolate flavor. I did not make mine with the hazelnuts. They do add an extra crunch, but the biscotti are still good without them. If you are feeling creative, it is really easy to dip the little biscotti in some melted chocolate or do a chocolate drizzle on top.


Double Chocolate Biscotti
Makes about 20

1/2 cup plus 1 teaspoon super fine sugar
1 egg
1/4 teaspoon almond or vanilla extract
1 cup all-purpose flour
2 tablespoons unsweetened cocoa powder
1/2 teaspoon baking powder
1/2 ounce unsweetened baking chocolate, finely chopped
2 1/2 ounces bittersweet chocolate, broken into rough pieces
3/4 cup roasted hazelnuts, skinned and roughly chopped (optional)
1 to 2 tablespoons water

1. Preheat the oven to 350°. Line a large baking sheet with baking paper or a baking mat.

2. In a large bowl, beat the sugar, egg, and almond or vanilla extract together until pale and thick, about 30 seconds to 1 minute, using an electric hand mixer. In a separate bowl, combine the remaining ingredients, except the water, with a metal spoon. Gently fold the flour mixture into the egg mixture to form a dough. If the dough is very crumbly, add the water, a little at a time to help moisten and pull the dough together. Remove the dough from the bowl and gently knead it on a lightly floured surface for about 30 seconds. Form a dough log about 10 x 2 inches in size (see picture above. I made mine about two inches tall and ten inches long). Place on the prepared baking sheet.

3. Bake in the hot oven for 20 to 25 minutes, or until the dough is firm to the touch. Remove from the oven and let cool completely. When you remove the log, also turn your oven down to 275°.

4. When the dough is cold, use a serrated knife to cut the dough into about 20 slices about 1/4 inch thick.

5. Place the biscotti slices on a fresh baking sheet and bake them in the warm oven 30 to 40 minutes, turning once, until they are very dry. Remove the biscotti from the oven and let cool completely. Enjoy!

Adapted from: The Big Book of Chocolate by Jennifer Donovan.


Saturday, November 12, 2011

Double Tree Chocolate Chip Cookies

Once, when I was in high school, we stayed at a Double Tree for an event, and I was introduced to the Double Tree Chocolate Chip cookie for the first time. I think over the course of the two days that we were there, my friend and I ate more cookies than we did regular food. So healthy, but hey, we were sophomores so it was fine. I still crave them on a regular basis.

And when those cravings appear, and we don't have the time to go on vacation (since it is usually the middle of the week), out comes this recipe. There are several quirky ingredients, but they are all worth it! It is similar to a regular chocolate chip cookie recipe, but these cookies have a little something more. My brother-in-law stayed with us for a couple days last weekend, so these scrumptious cookies made an appearance. My husband is always wanting me to make things in "man-sized" portions. He wants man-cakes, not just pancakes, and just one cookie should fit on a plate, not several. That makes these cookies absolutely perfect. Hopefully, they remind you of the warm cookies from the Double Tree, and as you eat them, imagine that you are not at home, but on vacation somewhere. That's what I did!


Makes 16 to 20 cookies
1/2 cup rolled oats
2 1/4 cups all-purpose flour
1 1/2 teaspoons baking soda
1 teaspoon salt
1/4 teaspoon cinnamon
1 cup (2 sticks) butter, softened
3/4 cup brown sugar, packed
3/4 cup granulated sugar
1 1/2 teaspoons vanilla
1/2 teaspoon lemon juice
2 eggs
3 cups semisweet chocolate chips
1 1/2 cups chopped walnuts

Preheat oven to 350°. Grind oats in a food processor or blender until fine. Combine the ground oats with the flour, baking soda, salt, and cinnamon in a medium bowl.

Cream together the butter, sugars, vanilla, and lemon juice in another medium bowl with an electric mixer. Add the eggs and mix until smooth.

Stir the dry mixture into the wet mixture with a wooded spoon and blend well. Add the chocolate chips and the nuts to the dough and mix until the ingredients are well incorporated.

Spoon rounded 1/4-cup portions of dough onto an ungreased cookie sheet. Place the scoops about 2 inches apart. You do not need to press the dough flat.

Bake for 16 to 18 minutes or until the cookies are light brown and soft in the middle. Let cool for a few minutes, then transfer to a cooling rack. Store in a sealed container when cool to keep the cookies soft.

Source: Originally from Todd Wilbur's The Best of Top Secret Recipes (2003)