Showing posts with label Cheese. Show all posts

Thursday, July 17, 2014

Pizza Pinwheels

Earlier in the summer, I was getting ready to be gone for a whole week. My husband is actually a pretty good cook, so I wasn't worried about him, but I knew that he would appreciate a few things that he could take to work or throw together with little effort. Enter the pizza pinwheel.

The grocery store next to where we live sells these things all the time, and I have been wanting to make them for a while. If you have all the pizza ingredients on hand (like I usually do), then pizza rolls are easy and fast to make with little notice. We put the leftover rolls in the freezer and found that they were great when reheated in the oven OR the microwave.


I used the same method for these rolls as I use when making cinnamon rolls. Roll out the dough, season it a bit, add some toppings, roll, and cut! That simple. Next time I make these, I might actually bake them all in a pan like cinnamon rolls. I think it would make for a fun presentation!

The dough for pizza pinwheels is the same as my easy whole wheat pizza crust, but this time I left out the whole wheat flour. Feel free to add it back in if you like. This pizza dough is really perfect for something like this. It gets crunchy on the outside, but stays very soft on the inside.


Pizza Pinwheels
Makes 10 to 12 rolls

For the dough:

2 cups all purpose flour, plus 1/2 cup more
1 Tablespoon sugar
2 1/4 teaspoons (1 packet) active dry yeast
1/2 teaspoon salt
1 cup warm water, about 115° 
2 Tablespoons olive oil 

For the filling:

olive oil
1 teaspoon each dried basil, oregano, and parsley
1/2 garlic powder
salt and pepper
20 to 25 slices pepperoni
4 to 5 strips crispy bacon
4 to 6 oz. shredded cheddar cheese
4 to 6 oz. shredded mozzarella cheese
1-2 Tablespoons melted butter

tomato sauce, for dipping


1. To make the dough, whisk together the 2 cups flour, sugar, yeast, and salt in a large bowl. In a liquid measuring cup, combine the warm water and the olive oil. Pour the water on top of the dry ingredients all at once, but do not stir. Allow the bowl to sit untouched for 10 to 15 minutes. 

2. When the time is up, stir the dough together, then move the dough to a well floured surface. Knead for about 5 minutes while adding up to 1/2 cup more flour. You might end up needing more than the 1/2 cup flour, just add the extra slowly as you are kneading. The dough should be smooth and slightly stretchy and still a little sticky. Transfer the dough to a bowl drizzled with olive oil, cover with plastic wrap, and allow it to rest for at least 30 minutes and up to 60 minutes.

3. While the dough is resting, gather your filling ingredients. While not necessary, I like to break the ingredients into smaller, bite-sized pieces so that they spread around easily.

4. When the dough has rested, roll it out into a large rectangle, at least 12 inches wide and 15 to 18 inches long. The dough should be an 1/8 inch to a 1/4 inch thick. Brush the dough with the olive oil and sprinkle with the basil, oregano, parsley, garlic powder, and salt and pepper. Add the rest of the ingredients along the length of the dough making sure to space them evenly. Leave several inches of dough uncovered at the edge furthest from you. Roll the dough the long way, just like you were making cinnamon rolls. Roll slowly, making sure the dough is tight and completely covering the filling at both ends.

5. When you get to the end, pinch the edge of the dough to make a seam. Use a sharp serrated knife to slice the roll into sections that are about 2 1/2 inches wide. Transfer the wheels to a lightly greased cookie sheet. You might need to gently push some of the filling back inside the roll to keep it all together.

6. Bake in a preheated oven at 400° for 12 to 15 minutes. When they are done, they should be dark golden brown. Immediately after removing them from the oven, brush the tops with melted butter and sprinkle with additional dried herbs. Serve with warm tomato sauce. Enjoy! 

Tuesday, May 21, 2013

Black Pepper Cheddar Popovers

Happy Tuesday!

If you are looking for giant popovers, then you came to the right place. This recipe makes the puffiest popovers I have ever seen, which makes them more fun to make and eat. The black pepper in these popovers makes them savory, so they would not be as good for jelly and butter as these. And if you are looking for really sweet popovers, then you should give these a try. 

The second best thing about popovers (the black pepper being first) is the cheese. It stays on the top and makes a wonderful, crispy layer. The original recipe calls for Gruyere cheese instead of cheddar cheese, but we always have cheddar on hand. I have made them twice now with the cheddar, and even though I am still planning on trying it with Gruyere sometime, I am really a fan of the cheddar. They are a great addition to breakfast or brunch, and I can't wait to try them with a bowl of homemade soup!


Black Pepper Cheddar Popovers
Makes 6 popovers

1 cup milk
2 eggs
1/2 teaspoon salt
1/4 to 1/2 teaspoon black pepper
1 cup flour
1 tablespoon butter, cut into 6 pieces
2 oz. cheddar cheese, cut into 6 pieces

1. Preheat the oven to 375°. Put a small cube of butter into each well of a popover pan*. Set aside until ready to use.

2. In a small saucepan, heat the milk to 125°, or until very warm but not bubbling. In a medium bowl, whisk the eggs together with the salt and pepper. When the milk has reached the desired temperature, slowly whisk it into the egg mixture in a small stream. Add the flour to the bowl, and whisk to combine. There may be small lumps in the batter. 

3. When the batter is all mixed, place the popover pan in oven to preheat for about 5 minutes. Quickly remove the pan from the oven and pour the batter into each well, about 3/4 of the way full. Place a cheese cube on top of the batter, and place the popover pan back in the oven. Bake for 40 minutes, until golden brown and puffed. Do not open the oven ahead of time, or the popovers might deflate. Enjoy!

*If you do not have a popover pan, you can use a muffin pan with about the same result. Reduce the butter and fill the muffin wells about half way with the batter. Also, cut the cheddar into smaller cubes before placing them on top. 

Source: Jodi Elliott from Tasting Table


Friday, October 12, 2012

Crab Rangoon Dip

One time when I was in high school, a lady from our church brought a crab Rangoon dip to an event. It was beautifully white and creamy with red sweet and sour sauce on top, and I remember being blown away that she made chips with egg roll wrappers. Brilliant.

I love crab rangoons, and lovingly refer to them at times as crab raccoons, much to my husband's annoyance. A Chinese meal would just not be complete without them. Over the years, I have made the traditional pinwheel shaped rangoons at home many times, but one thing I love about this dip is that is takes out a lot of the work. You don't have to fill and fold the wraps just right and then fry them in greasy oil that sometimes leave more of a mess than I really want to deal with. Actually, this recipe is probalby much healthier for you too since the components are baked instead of fried.

I could not decide if I should cut the wraps into strips or triangles, so I made about half and half. By the end of the evening, all of the strips were gone. They seemed to be easier to dip than the triangles, but feel free to make which ever ones you like.


Crab Rangoon Dip

For the chips:
1 package wonton or egg roll wraps
vegetable or canola oil

For the dip:
1 (8 oz.) package cream cheese, softened
2 cloves garlic, minced
2 tablespoons mayonnaise
2 teaspoons Worcestershire sauce
1 teaspoon lemon juice
3 green onions, thinly sliced
1/4 teaspoon salt
1/4 teaspoon black pepper
1/4 teaspoon onion powder
4 to 6 oz. canned crab or imitation crab, finely chopped
1/3 to 1/2 cup sweet chili sauce or sweet and sour sauce
green onions, to garnish

1. To make the chips, preheat the oven to 425°. Cut the wonton wraps into 1 inch strips or small triangles. Brush a baking sheet with 1 tablespoon oil, then lay the strips or triangles out on the sheet. Lightly brush more vegetable oil on the strips, just so that they are not dry. Bake in the oven for 5 to 7 minutes until they are lightly golden around the edges. Watch them closely because they brown quickly. Remove from the oven and let them cool on a cooling rack. Repeat with the remaining wraps, brushing the baking sheet with more oil as necessary. When all of the chips are baked, reduce the oven to 350°.

Note: The chips keep well in an air tight container and can be made ahead of time.

2. To make the dip, combine in a medium bowl all the dip ingredients except for the sweet chili sauce. Stir well to combine. Add more salt or pepper to taste. Spread the mixture in a shallow baking dish, such as a pie plate.

3. Evenly spread the sweet chili sauce over the top of the cream cheese mixture. Bake in the hot oven for 15 to 20 minutes until the dip is warm and bubbly. Garnish with more sliced green onions, and serve with the wonton chips. Enjoy!

Recipe adapted from mommiecooks.

Wednesday, September 5, 2012

Twice Baked Potato Skins

Saturday marked the first day of the Husker football season! Around our place, we never miss a Nebraska football game, even when the TV quits working an hour before the game starts. Long story short, we also have some great friends that let us crash their place when these things happen, so the crisis this past weekend was averted. I've been really excited for football to start this year because it signals the upcoming fall season and great things like cooler weather, long sleeve shirts, all things pumpkin. Yum.

Although I do really enjoy watching the Nebraska Huskers play, I think one thing I really look forward to during football season is the food. There are so many possibilities and it is so much fun to get together with a group of friends to eat, watch the game, and have a great time.

In honor of the Huskers and the upcoming season, I made Husker potato skins- twice baked potato skins to be exact, with as many "red" ingredients as I could throw together. They have chili powder, and tomatoes, and bacon, and, of course, red potatoes. If you use smaller potatoes, like red or Yukon gold, then cut them into fourths, which is what I did. If you use large potatoes, like russets, cut it into fourths then you might want to cut each fourth in half to keep the portions more bite sized.


Twice Baked Potato Skins
Makes 6 to 7 servings

5 to 6 medium potatoes

2 tablespoons butter
1 teaspoon chili powder
salt and pepper, to taste

1 or 2 small tomatoes, diced
1/4 cup sour cream
2 slices crisp bacon, crumbled
1/4 to 1/2 cup shredded cheese, like cheddar or Monterrey jack

1. Wash the potatoes and wrap in foil. Bake them for about 1 hour or until they are tender in a 350° oven. Allow the potatoes to cool. Increase the oven temperature to 400°.

2. When the potatoes are cool enough to handle, cut them into fourths length wise so that you have four long wedges. Using a spoon, remove most of the inside of the potatoes so that only the skins and a thin layer of potato remains. Put the scooped out potato in a medium bowl and set aside.

3. Melt the butter with the chili pepper. Brush the potato skins with the butter and season with salt and pepper. Place the skins on a cookie sheet and bake in the 400° oven for 15 to 20 minutes, until the skins are crispy.

4. While the skins are baking, add the sour cream, tomatoes, bacon, shredded cheese, salt and pepper, and any of the leftover melted butter to the bowl of the scooped out potatoes. Stir everything together until well combined.

5. Remove the potato skins from the oven and place a scoop of the potato filling on each skin. Sprinkle with some extra shredded cheese. Return the potatoes to the oven and bake until warmed through and the cheese is melted, 5 to 10 minutes. Allow to cool for a few minutes then serve. Enjoy!

Friday, June 1, 2012

French Onion Soup


It's funny how so many of the foods that I really love to eat also connect with someone else I know. I think that is one thing that I love about food so much. It brings people together in ways that few other things can, and at least in my life, I tend to remember the people along with the food. Strange, perhaps, but I can't help it! For example, carrot cake makes me think of my Grandma Lillian. There happen to be two people that French Onion Soup makes me think of: my dad and his dad, my Grandpa Dale. Both of these guys really like this soup and the times I ate this soup while growing up, I was always with one of them. I wish so badly that I could be at home making this soup for both of them right now and I know they would love it just as much as I would.

I did have the chance to make it for my parents when they visited a few weeks ago. I made soup and sandwiches for lunch, and by the time they left, the pot was scooped completely clean! Which is fine with me, since this soup doesn't seem to reheat as well as most soups. It is best right when after you make it.


French Onion Soup
Makes 4-5 servings

2 tablespoons butter
1 to 2 tablespoons olive oil
1 red onion, thinly sliced
1 yellow onion, thinly sliced
1/2 teaspoon sugar
1 clove garlic, finely chopped
1 can beef consomme
3 to 4 cups beef broth
1/4 teaspoon thyme
1 to 2 bay leaves
Slices French bread
4 to 5 slices good Swiss cheese

1. In a large stock pot, heat the butter and olive oil over medium heat, until the butter is melted and the pan is hot. Add in the sliced onions and toss to completely cover in the oil and butter mixture. Reduce heat to medium-low and put a lid on the pot. Allow the onions to cook, covered, for ten to fifteen minutes. When this time has passed, remove the lid and gently stir the onions. Add the sugar to the onions and continue to cook until the onions are caramelized and golden, about 30 to 40 minutes.

2. When the onions are caramelized, increase the heat to medium and add the garlic. Cook for a few more minutes, then add the can of beef consomme (still condensed) and the beef broth. Next, add the thyme, and the bay leaf. Cook the soup over medium heat for 30 minutes. If the soup begins to boil, turn down the heat a little to maintain a simmer.

3. To serve the soup, there are two things you can do, depending on the dishes you have. If you have soup crocks, then fill them with the soup and top with one or two pieces of French bread, then a slice of swiss cheese. Put the crocks in the oven under the broiler for a few minutes, until the cheese is melted and toasty. Remove from the oven and serve immediately.

If you do not have oven safe bowls, then you can put the slices of bread on a cookie sheet and top the bread with the cheese. Broil in the oven until the cheese is very melted, and then top bowls of the soup with one or two pieces. If you like crispier bread, I would recommend toasting the slices before you top them with cheese. Enjoy!


Saturday, October 15, 2011

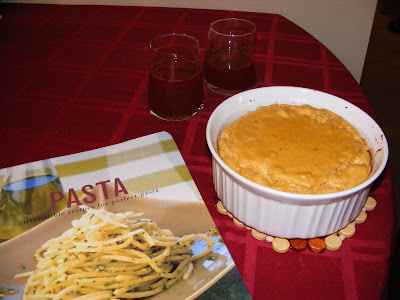
Macaroni Souffle

I have an amazing cookbook dedicated all to pasta, and unfortunately, I have only used it a couple of times since I got it many years ago. I think this was one of the first cookbooks I owned when I was growing up. It is full of beautiful pictures and easy-to-follow directions. One of the things I love about it most is that it is cross cultural. Although it mostly covers Italian style pastas, it also includes different kinds of noodle dishes from Asian, African, and the good old United States.


I have only made a souffle once in my life. Really the only thing I remember about the souffle is that it was strange and didn't really turn out like the picture. I think I was probably 13 or 14. So this weekend, I decided that it was high time to try a souffle again! This recipe came from my pasta cookbook, and since I had everything on hand, I just went for it.  This souffle was a great Saturday lunch, and we will definitely be making it again.


Macaroni Souffle
Serves 3 to 4

3 ounces short cut macaroni
melted butter, to coat
3 tablespoons dried bread crumbs
4 tablespoons butter
1 teaspoon ground paprika
1/3 cup all-purpose flour
1 1/4 cups milk
3/4 cup Cheddar or Gruyere cheese, grated
3/4 cup Parmesan cheese, grated
3 eggs, separated
salt and ground black pepper

Cook the macaroni in plenty of boiling salted water according to the instructions on the package. Drain well and set aside. Preheat the oven to 300°F.

Brush a 5-cup souffle dish with melted butter, then coat evenly with the bread crumbs. shaking out the excess from the pan.

Put the butter, paprika, flour and milk into a saucepan and slowly bring to boil, whisking constantly until the mixture is smooth and thick.

Simmer the sauce gently for 1 minute, then remove from the heat and stir in the cheeses until melted. Season well and mix with the cooked macaroni.

Beat in the egg yolks. Whisk the egg whites until they form soft peaks and stir a quarter into the sauce mixture to lighten it slightly.

Using a large, metal spoon, carefully fold in the rest if the egg whites and transfer to the prepared souffle dish.

Bake in the center of the oven for about 40 to 45 minutes, until the souffle is risen and golden brown. The middle should wobble very slightly and the souffle should be lightly creamy inside.

Source: Pasta: Irresistible Recipes for Perfect Pasta (2001)